What data recovery tools to buy if you want to start a data recovery business?
Free video data recovery training on how to recover lost data from different hard drives?
Where to buy head and platter replacement tools at good prices?
Data recover case studies step by step guide
I want to attend professional data recovery training courses
When we are using seagate hard drives, one of the most common errors we meet is “Delayed write failure errors”! Sometimes they display as Event ID 51 in the Windows Event Viewer.
Possible causes for delayed write failures
This error occurs with external drives connected via USB or 1394/Firewire.
Seagate Delayed write failure errors fix
Warning: Please understand that you must attempt any of the following instructions at your own risk.
Please also be sure to backup your registry before attempting this, as a mistake can cause serious damage to your operating system installation and your data.
Step 1: Taking a drive to a different computer will often fix the error. If the error no longer appears on the second computer, then the problem is system-related on the first computer; it is not drive-related.
If the problem does not recur, there could be a problem with the USB port on your computer. Be certain to try connecting your hard drive directly to the USB port on the rear of your computer
If the problem follows the drive, please replace the USB cable and try again.
Step 2: If your external drive is connected via a USB hub (which connects to one USB port on your computer but contains multiple USB ports, to allow connection of more devices), try connecting your hard drive directly to the USB port on the rear of your computer.
Connecting the drive to a powered USB hub is another possible solution.
Step 3: Remove all other USB or Firewire devices from the computer (leaving only the external drive connected) to see whether the error appears again.
Step 4: If two USB or 1394/Firewire devices are connected to ports on the same USB or 1394/Firewire PCI card, these errors can occur. Try connecting only one external drive to the computer. If the problem stops, a PCI USB card may help if you need to use multiple external drives simultaneously on the same computer.
Step 5: Please run a diagnostic on the drive. You may use either the diagnostic that comes in the Maxtor OneTouch Manager or FreeAgent software (Test My Drive), or .
Step 6: Follow this procedure:
1. Right-click on My Computer (in XP/2000) (Computer in Vista).
2. Click on Manage.
3. Choose Device Manager.
4. Choose Disk drives.
5. Right-click on the hard drive.
6. Choose Properties.
7. Choose the Policies tab.
8. Set the drive to “Optimize for Quick Removal”.
If this does not work, or if this value was already set, continue on.
Step 7: Change the drive letter assigned to the external drive. Occasionally there can be a conflict with a different device trying to use the same drive letter in Windows.
Step 8: Confirm you are on the current Service Pack level for Windows.
Step 9: If you have Windows XP Service Pack 2 for Windows XP, review Microsoft KB article 885464.
Step 10: Always use the Safely Remove Hardware function of Windows when disconnecting the external drive. If the drive was disconnected while a file was being written to the drive, this error could occur.
Step 11: Confirm that some of the communication between the computer and the external drive is not blocked by a firewall.
Windows XP Service Pack 2 has an added feature called a firewall which helps protect your system from being accessed from the outside. This firewall feature is enabled by default when you install Service Pack 2 and it can block transfers to/from the external drive. This normally happens on the 1394/Firewire port, but has also been seen on the USB port.
TEMPORARILY disable the firewall and transfer data to and from the drive. This will confirm if the firewall is the cause of the delayed write error you are seeing.
 BE SURE TO ENABLE THE FIREWALL AFTER TROUBLESHOOTING IS COMPLETE.
To disable the Firewall in XP SP2:
- Click on Start.
- Choose Settings (not always necessary).
- Open Control Panel.
- Double-click the Firewall icon.
- Select the OFF option.
To disable the Firewall in Vista:
- Click on Start.
- Choose Settings (not always necessary).
- Open Control Panel.
- Double-click the Firewall icon.
- Click Change Settings.
- Select the OFF option.
(Click to expand.)
|
|
|


If this fixes the issue, you may be able to go to the Advanced tab and uncheck the 1394 connection and USB connections to disable the firewall on those connections only (if those connections are only used for the external drive).
(Click to expand.)

Step 12: For FreeAgent Pro and Go drives only – Adjusting the drive’s lights has sometimes been observed to reduce or eliminate this error’s occurrence. Please see the following documentation on how:
Set the drive lights to the “Turn lights off” option.
Step 13: Check any other firewall softwares you may have operating on your system and confirm that they are not hindering detection or file-writing issues. It may be best to check with the firewall software’s support department in order to troubleshoot this.
Also see Microsoft Support article 818788 and Microsoft Support article 320855 for more information.
Step 14: Refer to the instructions and information in Microsoft Support article 330174, specifically those steps found under the subheading “Workaround”.
>>Note:
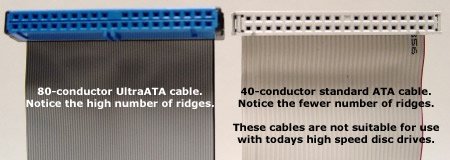
For Parallel ATA/IDE drives:
Step 1: Confirm you are using an 80-conductor UltraATA cable and not one of the older 40-conductor cables. Please note that rounded (as opposed to flat) ATA/IDE cables can certainly be the culprit as well.
Step 2: Test the drive using Seatools for Windows.
Step 1: Confirm the cable is firmly connected to the drive.
If the drive cables come loose repeatedly, use locking SATA cables or reposition the drive in the case so that pressure/tautness on the cable is reduced.
Step 2: Confirm you are using the current SATA driver from your motherboard/SATA controller vendor.
Step 3: Test the drive using Seatools for Windows.
More information you can contact Seagate Official Support
Data recovery salon is dedicated in sharing the most useful data recovery information with our users and only if you are good at data recovery or related knowledge, please kindly drop us an email and we will publish your article here. We need to make data recovery Salon to be the most professional and free data recovery E-book online.

Comments are closed
Sorry, but you cannot leave a comment for this post.