What data recovery tools to buy if you want to start a data recovery business?
Free video data recovery training on how to recover lost data from different hard drives?
Where to buy head and platter replacement tools at good prices?
Data recover case studies step by step guide
I want to attend professional data recovery training courses
The following information is provided by Ahmed Samy in HDDguru and here to share with all about the useful ideas. Thanks to Ahmed.
Clicking Noise and Continuous Noise in WD HDDs, Especially Related To L-shape PCBs.
* The Clicking Noise
when u power on the hard drive u will hear a noise like (click,click….click,click…click,click)
this noise may be related to the head stack or PCB, the first thing you have to do is to check the PCB By The following steps:
1- first u have to clean the Whole PCB With a Solvent & Toothbruch then wipe it with a piece of smooth handkerchief to remove the dust & dirt from it.
Caution: Cleaning of the PCB must be done carefully to avoid removal of any small electronic components.
2- Check the Resistor (R120) , [ the right value of this Resistor is (0.12 Ohm) ] ,u may adjust ur multimeter to Resistor Measuring Mode to Determine its Value ,if it’s Damaged u have to replace it. but before that, u have to check Transistor Q3 , it’s a 6 pins transistor , for measuring this transistor u may adjust ur multimeter to Diode Mode,[ the right Value will be: (first two pins = 0.000 , second two pins =0.000 , Third two pins = nearly over 600)]
if Q3 is Damaged it will burn ur R120 after u replace it , so be sure that Q3 is ok before replacing R120 & u may also Check Transistor Q6 by the previous method to be completely sure it’s safe to replace R120.
Note: ( to be sure of The right values of these electronic components u may compare the values u have measured with the values of a working PCB’s Components)
3- Check The Coils (such as L2 & L7) – adjust ur multimeter to diode mode then the right value must be ( 0.000 ) for any coil as u all know.
4- inspect the whole PCB for any removed component ( such as small capacitors or Resistors ) … the removal of these small components may occured while forced cleaning of the PCB …. so becareful while cleaning it.
5- in rare cases the firmware microchip may be damaged.
* The Continuous Noise
sometimes there is a continuous noise come from WD HDDs mainly with L-shape PCBs
with motor ICs ( Smooth 1.3) , (L6278 1.7) & (L6278 1.2).
the noise is like : Trrrrrrrrrrrrrr or Trrrr….Trrrr…Trrrrr
so all we have to do for fixing this problem is:
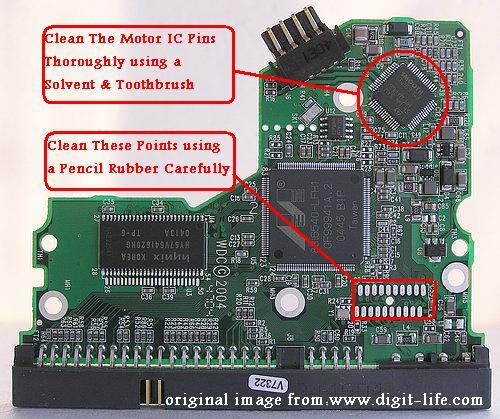
1- clean the connection points which connect the head stack pins with the PCB using a pencil Rubber …carefully.
2- clean the motor IC pins thoroughly using a solvent & Toothbrush then wipe it with a piece of smooth handkerchief to remove the dust & dirt from it.
-Note- the two steps mentioned above solve the problem in few cases.
3- if the two steps mentioned above didn’t fix the problem , you have to replace the motor IC cause it’s damaged.
-Note- in case of Motor ICs (L6278 1.7) & (L6278 1.2) first try to desolder them then resolder them again before u decide to replace them with a new ones … this sometimes work , but if it didn’t work … replace them directly.
– in case of Motor IC (Smooth 1.3) you must replace it directly.
The image below Shows you where to clean.
Data recovery Salon welcomes your comments and share with us your ideas, suggestions and experience. Data recovery salon is dedicated in sharing the most useful data recovery information with our users and only if you are good at data recovery or related knowledge, please kindly drop us an email and we will publish your article here. We need to make data recovery Salon to be the most professional and free data recovery E-book online.


Comments are closed
Sorry, but you cannot leave a comment for this post.